CNN (with NLP)
CNN 1-dimentional
Intro
CNN(Convolutional Neural Network)이 처음 제시된 것은 1998년이었다. 처음 모델이 제안되었을 당시에는 현재와 달리 대규모 데이터 셋 및 GPU의 발전이 미약했다는 점 등 CNN을 사용하기에 부족함이 있었다.
Gradient-based learning applied to document recognition, Lecun et al., 1998
CNN paper
이런 와중, 2012년에 ILSVRC(이미지 분류 및 객체 탐지 알고리즘 대회)에서 사용되었던 AlexNet에 의해 CNN은 크게 재조명 되었다. 당시 대회에서 높은 분류 정확도로 우승하여 새로운 딥러닝의 시대를 알리는 계기가 되었다.
ImageNet Classification with Deep Convolutional Neural Networks, Krizhevsky et al., 2012
AlexNet paper
CNN은 이미지 처리, 객체 탐지 등 다양한 분야에서 응용되었다. 영상이나 이미지에 주로 사용이 되었지만, 자연어 처리 분야(NLP)에서도 많은 효과들이 입증되었다.
해당 글에서는 NLP에서 CNN을 다루는 1D-CNN에 대해서 다뤄보도록 하겠다.
CNN (Convolutional Neural Network)
이미지, 텍스트 등 데이터를 합성곱 연산과 풀링 연산을 통해 특징 추출 및 분류 등을 진행할 수 있는 모델
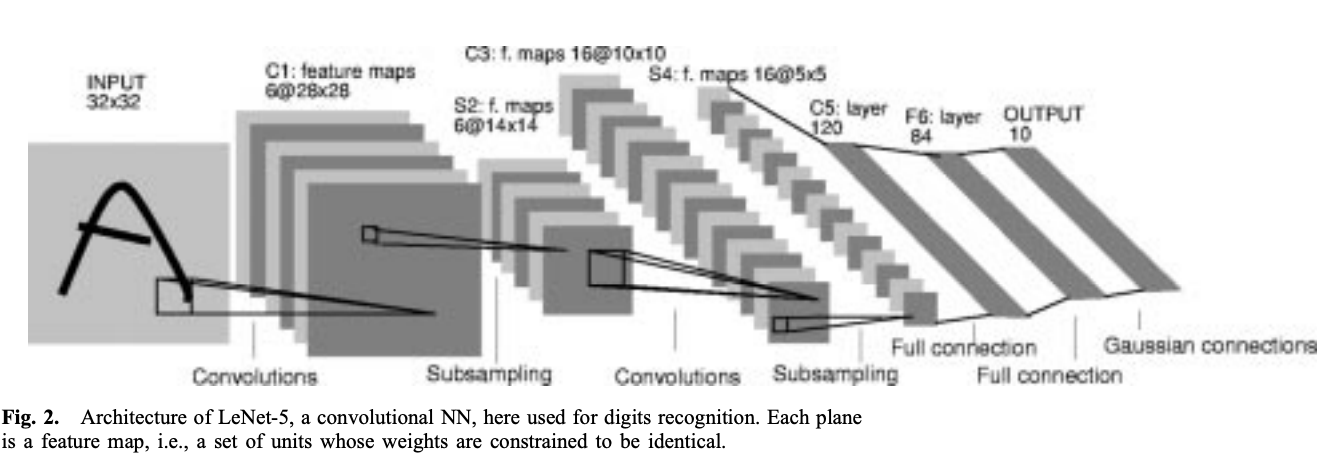 CNN model Architecture
입력 데이터의 차원에 따라서 1차원 배열이면 1D, 이미지처럼 2차원 행렬 데이터면 2D로 구분된다.
텍스트는 1차원의 벡터 형태로 모델에 입력되기 때문에 1D에 속한다.
1D-CNN의 프로세스는 다음과 같다.
- 1D 데이터 입력을 받고,
- 합성곱을 통해 데이터의 특징(패턴)을 학습하여 Feature Map을 출력한다.
- 이를 ReLU와 같은 활성화 함수(Activation Function)를 적용시켜 음수 값을 제거하고 비선형의 복잡한 패턴을 학습한다.
- 이후에 풀링(Pooling)층에서 MaxPooling이나 AveragePooling 등을 거쳐
- 완전 연결 층(Fully Connected Layer)에 입력하여 최종 출력을 계산한다.
1D-CNN 코드 구현
다음은 1D-CNN을 코드로 구현한 예시이다.
리뷰 텍스트를 통해 구현해 보기 위해 오픈 데이터 셋인 Amazon.com의 가벼운 용량의 Gift_Card 데이터를 사용하였다.
1
2
3
4
5
6
7
8
9
10
11
12
13
14
15
# Package
import gzip
import json
import pandas as pd
import numpy as np
import tensorflow as tf

import nltk
from nltk.tokenize import word_tokenize
from nltk.corpus import stopwords
from gensim.models import Word2Vec
from tensorflow.keras.preprocessing.sequence import pad_sequences
from tensorflow.keras.models import Sequential
from tensorflow.keras.layers import Conv1D, GlobalMaxPooling1D, Dense, Dropout
from sklearn.model_selection import train_test_split
1
2
3
4
5
6
7
8
9
10
11
12
13
14
15
16
17
18
19
20
21
22
# gzip 파일 풀고 DF로 저장
def parse(path):
    g = gzip.open(path, 'rb')
    for l in g:
        yield json.loads(l)

def getDF(path):
    i = 0
    df = {}
    for d in parse(path):
        df[i] = d
        i += 1
    return pd.DataFrame.from_dict(df, orient = 'index')

# 불용어 처리 함수
def stopword(tokens):
    return [word for word in tokens if word.lower() not in stop_words]

# 리뷰 토큰을 벡터로 변환
def review_to_vec(review, model, vector_size = 100):
    vectors = [model.wv[word] for word in review if word in model.wv]
    return vectors
getDF 함수로 데이터를 불러온 후, head를 찍어 데이터를 보면 다음과 같은 형식이다.

여기서 사용자의 리뷰를 다루는 text 컬럼을 사용하여 불용어 처리 및 토큰화를 진행하고 이를 Word Embedding을 통해 모델에 입력할 준비를 하였다.
불용어 처리 및 토큰화는 nltk 라이브러리를 사용하였고, Word Embedding은 간단히 Word2Vec으로 진행하였다.
1
2
3
4
5
6
7
8
9
10
11
12
13
14
15
16
17
# # nltk.download('punkt')
# nltk.download('stopwords')
stop_words = set(nltk.corpus.stopwords.words('english'))

df_token = data['text'].apply(lambda x: word_tokenize(x) if isinstance(x, str) else [])

# 불용어 처리
df_stop = df_token.apply(lambda x: stopword(x) if isinstance (x,list) else [])

# Word2Vec Embedding
token_review = df_stop.tolist()
df_filtered = Word2Vec(sentences = token_review, vector_size = 100, window = 5, min_count = 1, workers = 4)
'''
window = 문맥 창 크기, min_count = 학습에 사용할 최소 빈도
'''
word_vector = df_filtered.wv['good']
print(word_vector)
여기서 각 단어가 어떻게 100차원의 벡터로 표현되는지 출력해 보면 다음과 같다.
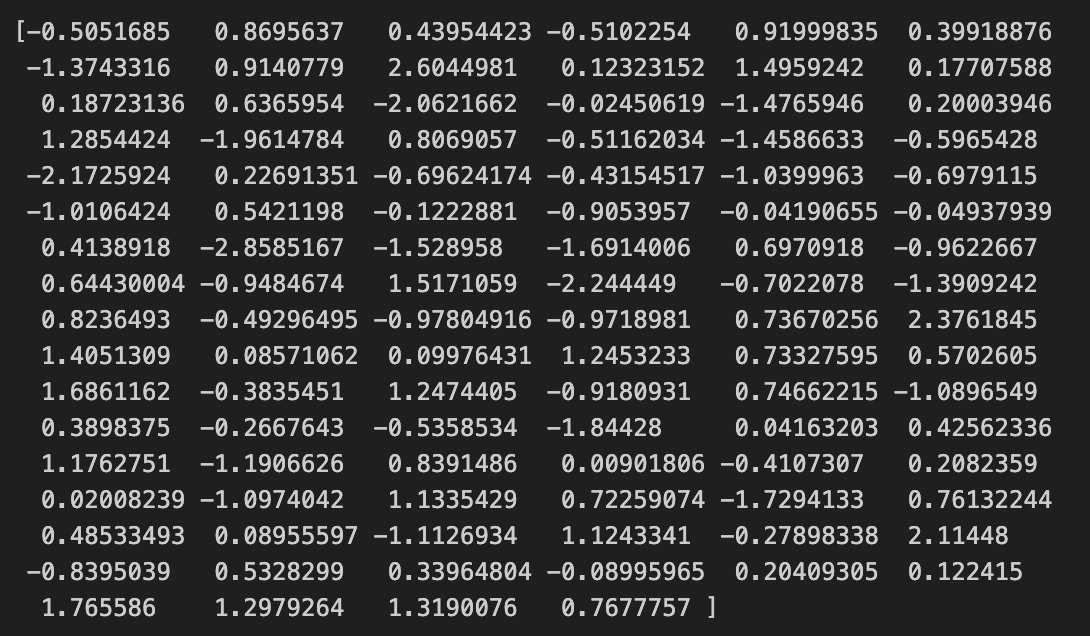
본 결과는 각 단어당 100차원의 벡터 형태로 변환이 되고, 이렇게 각 리뷰별로 단어 수 만큼의 100차원의 벡터로 구성되게 되어진다.
이후, 리뷰 벡터를 CNN에 입력하기 위해서 리뷰 별 차원을 맞춰주고, 컨볼루션 및 풀링 층에 입력하여 리뷰 내의 특성을 추출하고 차원을 축소하여 최종 결과를 출력하도록 하였다.
1
2
3
4
5
6
7
8
9
10
11
12
13
14
15
16
17
18
19
20
21
22
23
24
25
26
27
review_vector = df_stop.apply(lambda x : review_to_vec(x, df_filtered))
max_len = 50
X = pad_sequences([np.array(r) for r in review_vector], maxlen = max_len, dtype = 'float32', padding = 'post', truncating = 'post', value = 0)

# 1D-CNN
model = Sequential()
model.add(Conv1D(filters = 128, kernel_size = 5, activation = 'relu', input_shape = (max_len, 100)))
model.add(GlobalMaxPooling1D())
model.add(Dense(64, activation = 'relu'))
model.add(Dropout(0.5))
model.add(Dense(1, activation = 'sigmoid'))
model.compile(optimizer = 'adam', loss = 'binary_crossentropy', metrics = ['accuracy'])
model.summary()

# train_test_split
X_train, X_test, y_train, y_test = train_test_split(X, y, test_size=0.2, random_state=42)

print("학습 데이터 크기:", X_train.shape, y_train.shape)
print("테스트 데이터 크기:", X_test.shape, y_test.shape)

# model fit
model.fit(X_train, y_train, epochs=10, batch_size=32, validation_split=0.1)
loss, accuracy = model.evaluate(X_test, y_test)

print(f"테스트 데이터 손실 (Loss): {loss:.4f}")
print(f"테스트 데이터 정확도 (Accuracy): {accuracy:.4f}")
매우 간단하게 구현하고자 하여 성능이 높진 않으나 해당 프로세스를 활용해서 리뷰 텍스트를 활용한 분석을 통해 다양한 방식으로 사용할 수 있다.
(추후 수정 및 추가..)